
How to add custom font to squarespace Website
We all want our business website to look impressive and ahead of the competition. A trustworthy website with an attractive design has been known to raise the conversion rate significantly. Fonts are one of the important design elements that builds brand recognition.
Though Squarespace offers a large library of adobe and google fonts that you can choose from, there are times when a particular font that resonates with you and your brand isn’t available in Squarespace font library. That’s not a cause to worry because Squarespace provides an option for you to add your custom fonts. We will break it down into simple steps and also attach a video for further explanation.
Typography is an integral part of design. The fonts you choose says a lot about your brand. It can convey moods, feelings, emotions and even reflect the personality of your business. When you are choosing fonts for your website, it is best to stick to two fonts maximum. I know you may be thinking “But these fonts are so beautiful, I wish I could use all the fonts”. But have you ever visited a website that used too many fonts? If yes, then you must have found it hard to concentrate on the site’s content.

Related Article: 16 Best Font Combinations On Squarespace For Standout Website Not just that, too many fonts increase the loading time of your website. This is because browsers download each of your website’s fonts when loading. The more the fonts, the longer the loading time. The longer the loading time, the more users you will lose. According to a research conducted by Forrester Consulting, two seconds is an online shopper’s expectation for a web page to load while 40% of shoppers will wait no more than three seconds before abandoning a retail site.
Trust me on this, using two fonts would give you the beauty you desire. If you want to further beautiful your website, you can play with the weights and styles of the fonts.
If you are still new to Squarespace (welcome home), and you’ve not figured out the best Squarespace font combination that would communicate your business brand, you can check out this article on the best Squarespace font combination for any business.
With no further ado, let’s go straight to the steps you need to take to add a custom font to your website. Note that these steps work both on your Squarespace 7.0 and 7.1
add custom font to Squarespace tutorial video
Looking for a unique website design for your business? Explore our Squarespace Web Design packages for a stunning website. Need to enhance your site's visibility? Our Squarespace SEO services are here to assist you. Curious about our work? Take a look at our Squarespace website designer portfolio for some inspiration!
Step One: Download and Upload your font
The first step is to download your custom font file and make it available for upload. Do not forget make sure you have full rights of usage because most font sites specify that the fonts are meant for personal use only. You don’t want to get into any annoying case. To avoid this issue, the best thing to do is to purchase a font. Creative Market offers affordable fonts with full usage rights. Also, Font Squirrel and Google Fonts provides free fonts that you can use as well.
Now that you have downloaded your custom fonts, the next thing is to upload your fonts.
Go to your Squarespace dashboard, from there go to Design > Custom CSS, scroll down to the bottom and click on ‘Manage Custom files.’ Locate your font file and upload it.

Step 2: Add your custom font to CSS Code
At this stage, you need to confirm the type of font file you have to determine the type of code you will input. It is not complicated, you can do this!
There are four major types of font files which
are ‘woff’, ‘woff2’, ‘truetype’(ttf) and ‘opentype’(otf).
To determine your font format, all you need to do is to check your font folder. At the end of the font folder’s name, you would see something like .ttf or .otf. An example of how the file folder may look like is PPCirka-Variable.ttf
Great! Now that you have determined your custom font format, it is time to input the appropriate code.
Go to Design > Custom CSS, copy and paste one of the codes that support your font file format below

For an otf font file format, the code is
@font-face {
  font-family: 'MyWebFont';
  src: url('webfont.otf') format('opentype');
}
For woff font file format
@font-face {`
font-family: 'MyWebFont';
src: url('webfont.woff') format('woff');
}
For woff2 font file
@font-face {
 font-family: 'MyWebFont';
 src: url('webfont.woff2') format('woff2'):
}
For .ttf font file
@font-face {
 font-family: 'MyWebFont';
 src: url('webfont.ttf') format('truetype');
}
Now that you have copied the appropriate code, time to edit. It would be nice if you already have the content you want to change its font on your website, this way you would be able to see the font being changed automatically as you apply the codes.
norman-italic Let’s say you are uploading a .otf font file format, the CSS code would be
2.1 Add your font name:
Replace MyWebFont with the custom font name. When unsure of the font name, check the name on the file folder. Make sure the name of the font is between the two quotation marks. If you are using norman-italic.otf for example, it would be
@font-face {
  font-family: 'norman-italic';
}

2.2 Upload your font file URL:
@font-face {
  font-family: 'norman-italic';
  src: url('') format('opentype');
}

Delete the webfont.otf between the two-quotation mark and place your cursor exactly between the two quotation marks. It would look like this
2.3 Add your font Url

Like I said earlier, it is important to place your cursor exactly between the two quotation marks in the bracket. When the cursor is where it’s supposed to be, click on Manage Custom Font and select your font file. Automatically, Squarespace would turn the file into a url.
Great! You are through with the second step of the process. Pretty straightforward right?
Step 3: Apply custom font to a heading or Paragraph
Now that you have uploaded the name and url of the font, you would need to assign the responsibility the font is meant to serve. To assign responsibility to the font, you would need to copy this code
If you are assigning the font to Heading 1, it would look like this
h1 {
  font-family: 'norman-italic';
}

Let’s assume you want to apply the font to all your headings, that is H1, H2, H3 and H4. All you need to do is to type each heading separated by a comma. It would look like this
h1, h2, h3, h4 {
  font-family: 'norman-italic';
}
The same goes for paragraphs, you would only need to delete the h1 and replace it with p. Here is what it would look like
p {
  font-family: 'norman-italic';
}
And you are done! The fonts on your content would change automatically change to the new fonts you just assigned. I told you it wasn’t that hard.
The last thing to do is hit the SAVE button
Advanced Custom Font Styling
Life is boring when there is no sprinkle of fun, color and surprises. Yes, the same applies to fonts.
Squarespace already predicted that users would want to adjust their fonts to go in line with their brand. Adjustments like adding color, making it bigger or smaller or even increasing the space to limit the clustering feeling it gives. Therefore Squarespace decided to give users the freedom to adjust their font however they want to.
If you have ever wondered how to change a font's color in Squarespace or make any adjustments, I am here to show you how to do just that! Let me show you the code to use.
p{
  font-family: 'add your font name here';
  color: red;
  letter-spacing:1px;
  font-size: 24px;
  font-weight: bold;
  text-transform: capitalize;
  line-height: 1.3em;
}

This code is specifically for paragraphs but if you want to adjust your headings or any other part of the website, all you need to do is to change the ‘p’ to the specific squarespace element identifier e.g. h1
Unless you need to apply a specific unique code to your let’s say H1, I would recommend changing these in the Squarespace font settings rather than adding CSS. Squarespace has a lot of settings you can be tweaked and customized, and it's usually easier and less technical.
How to Adjust the Custom Font for Mobile
In Squarespace, changing your website fonts doesn’t mean it would automatically apply to the mobile version but not to worry, that can be sorted out with a little bit of code. Let’s get right into it.
The code for the mobile version is as follows
@media only screen and (max-width: 600px) {
  add your style here
}
The max-width means that the font change can only apply to 600px screen resolution and lower resolutions, anything beyond 600px will deactivate the font change. You can decide to change the max-width to fit your preferences.
After this, you can add whatever styles and function you want the font to serve such as headings, paragraphs etc. as we discussed earlier in the article. All you need to do is to copy the font codes for your website, delete the ‘add your style here’ and paste it in the parenthesis. For example,
@media only screen and (max-width: 600px) {
  h1, h2, h3, h4 {
    font-family; ‘MyWebFont’;
  }
}

I hope you are getting a hang of it. If you are still confused, there is a video attached to this blog that can clear your doubts.
How to Adjust the Custom Font for Mobile
For sure I’m not the only one who has spent many hours tweaking settings in CSS in order to make my website work well on mobile. Here is a great way to make your fonts to be applied only on mobile version of the website. Let’s get right into it.
The code for the mobile version is as follows
@media only screen and (max-width: 600px) {
  add your style here ;
}
The max-width means that the font change can only apply to 600px screen resolution and lower resolutions, anything beyond 600px will deactivate the font change. You can decide to change the max-width to fit your preferences.
After this, you can add whatever styles and function you want the font to serve such as headings, paragraphs etc. as we discussed earlier in the article. All you need to do is to copy the font codes for your website, delete the ‘add your style here’ and paste it in the parenthesis. For example,
@media only screen and (max-width: 600px) {
h1, h2, h3, h4 {
  font-family; ‘MyWebFont’; }
}
I hope you are getting a hang of it. If you are still confused, there is a video attached to this blog that can clear your doubts.
Custom font for blog header in Squarespace
Did you know that Squarespace automatically assigns a unique id to different heading throughout the site. So for example blog title and product title would have different id tag. In order to change font style in each one of them you need to use corresponding CSS class name. Below you will find code snippets to change font style for the different parts of your website.
For blog post title on a summary page
.blog-title{
font-family: 'your font name here' !important;
}
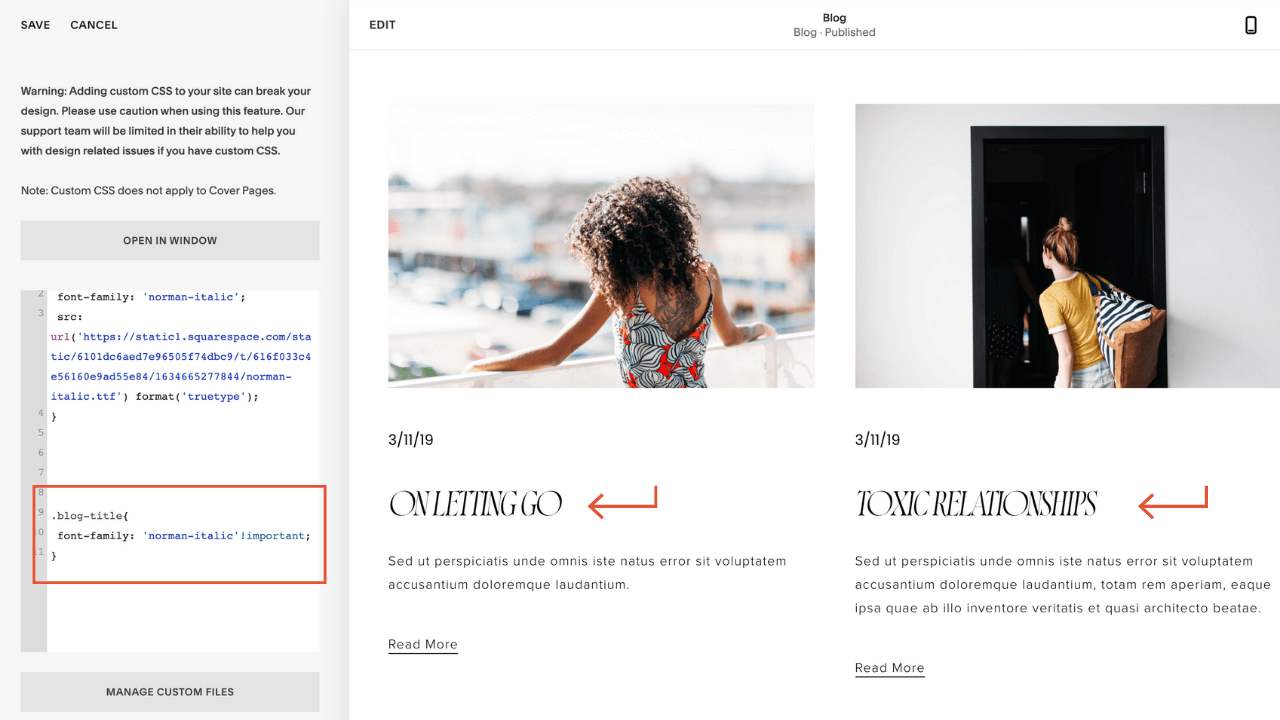
Important tag at the end of the code will indicate that that your code is more important then the one that was assigned automatically by the Squarespace
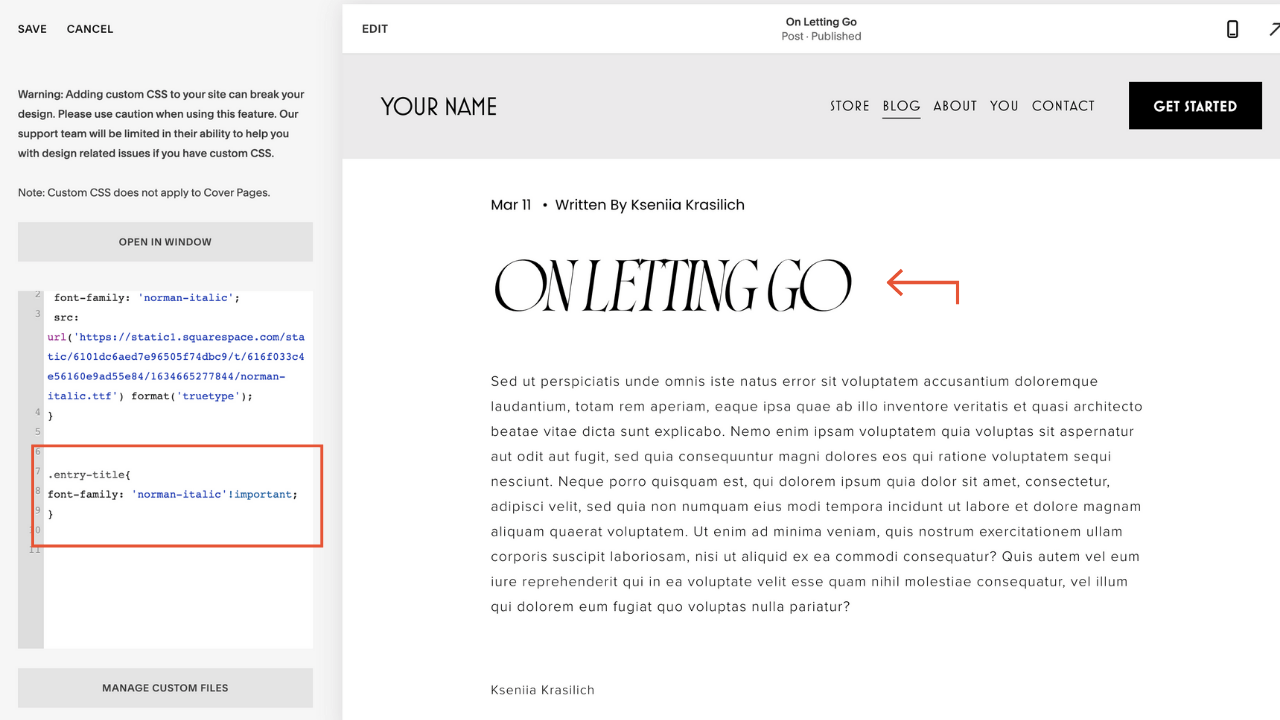
For blog title in the blog article
.entry-title{
font-family: 'your font name here' !important;
}
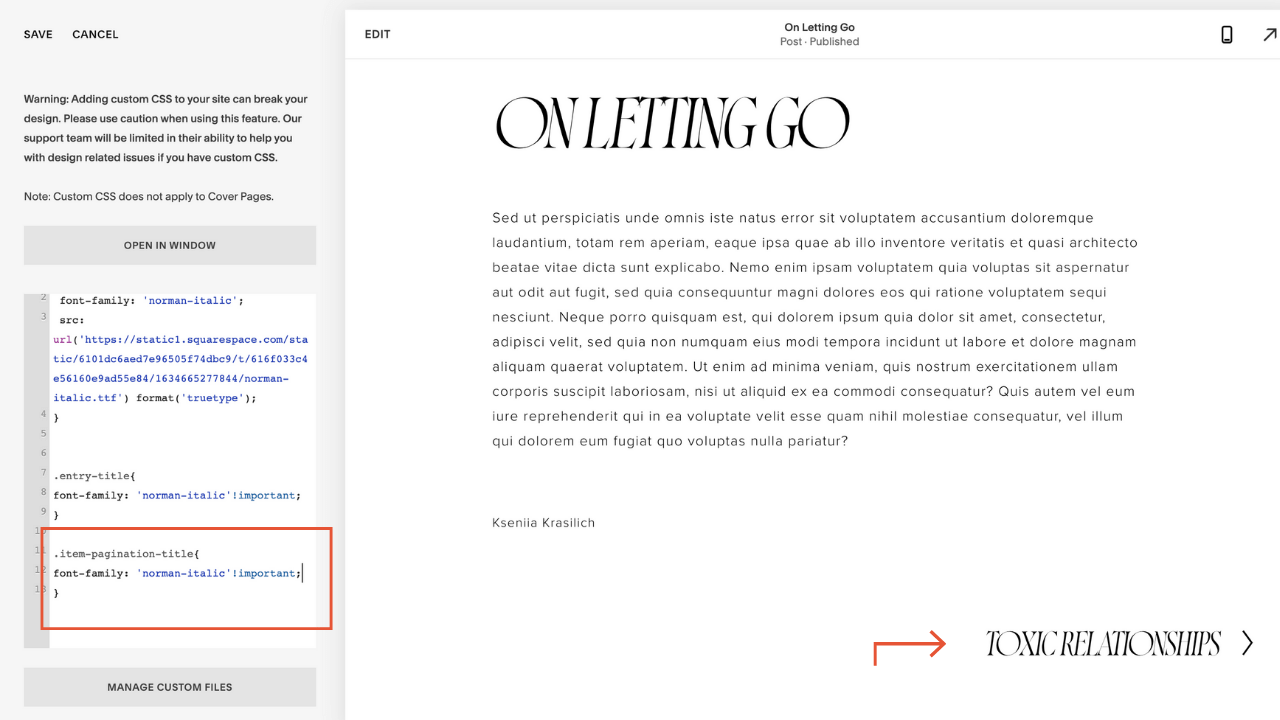
Custom font for pagination title
.item-pagination-title{
font-family: 'your font name here' !important;
}
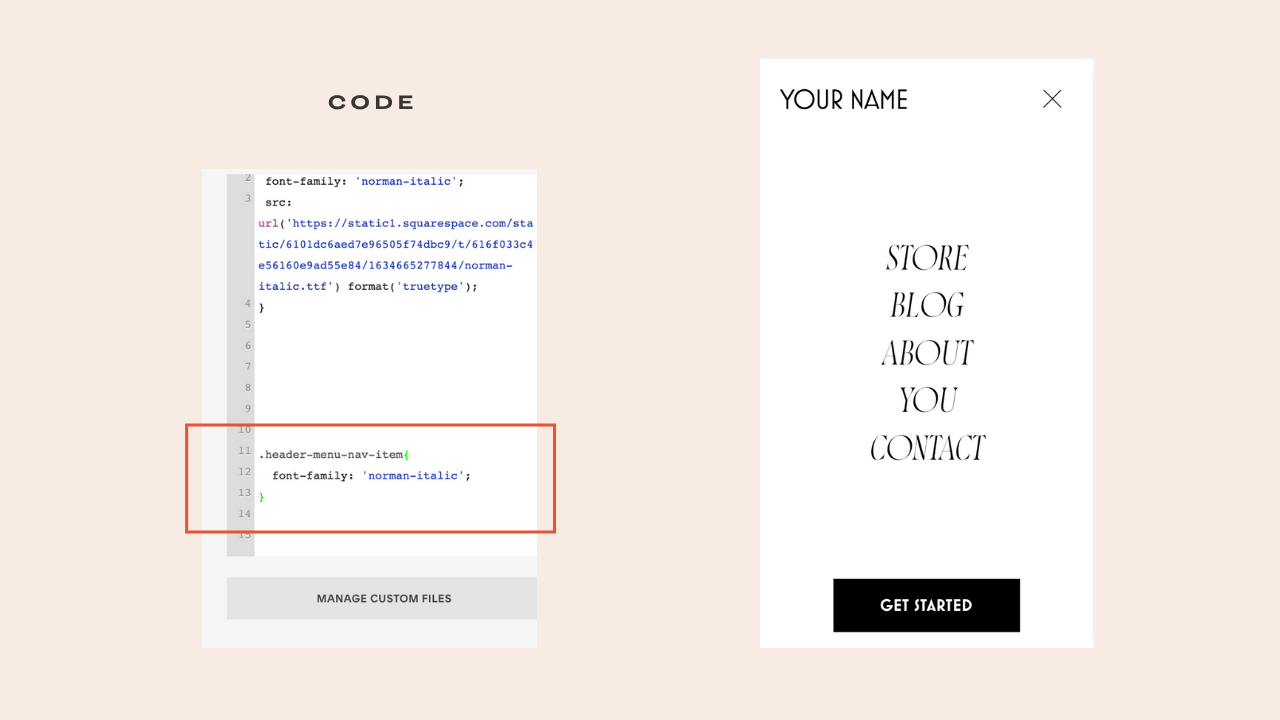
Now, let’s go to the navigation bars. You can change your navigation bar font on both the website and mobile versions.
Custom Font for mobile Navigation
.header-menu-nav-item{
font-family: 'your font name here' !important;
}
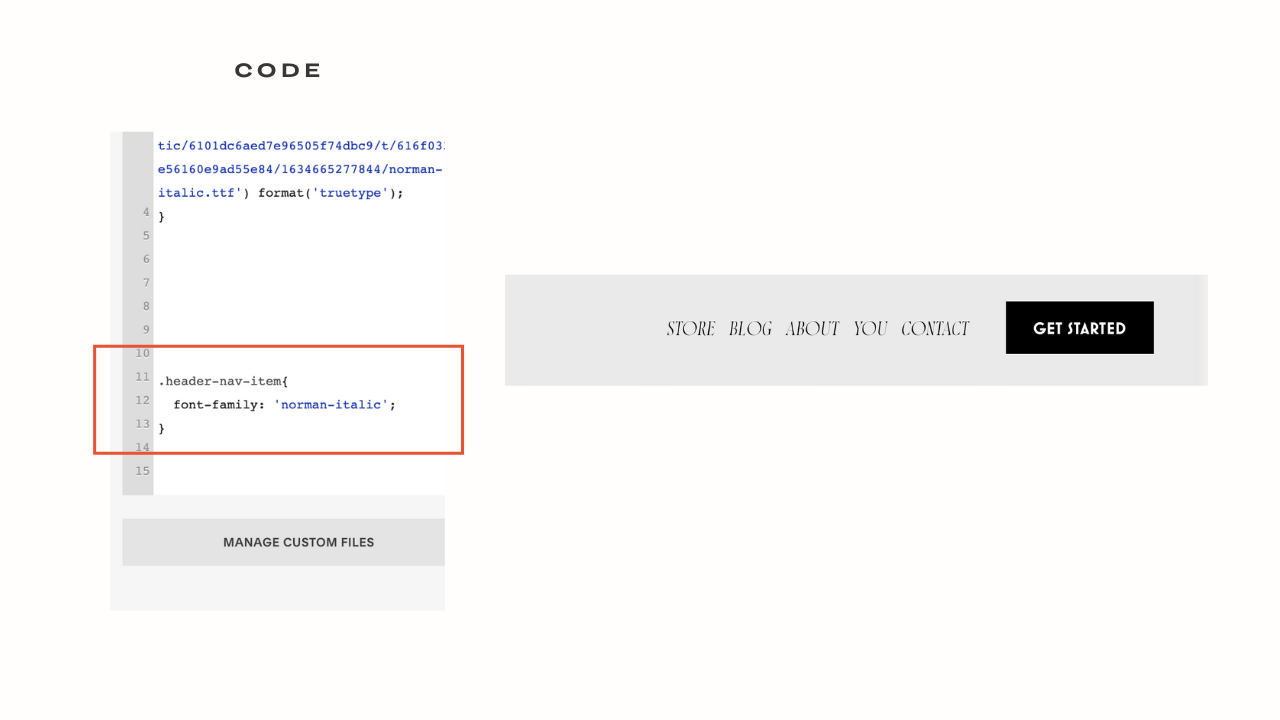
Custom Font for desktop Navigation
.header-nav-item{
font-family: 'your font name here' !important;
}
Custom font for product items
So, you might be wondering how to change the font for your product titles. Well, there is a way and it’s really easy if you know the correct CSS code.
Here is the code you will use to change your product item fonts.
.ProductItem-details-title{
  font-family: 'your font name here' !important;
}
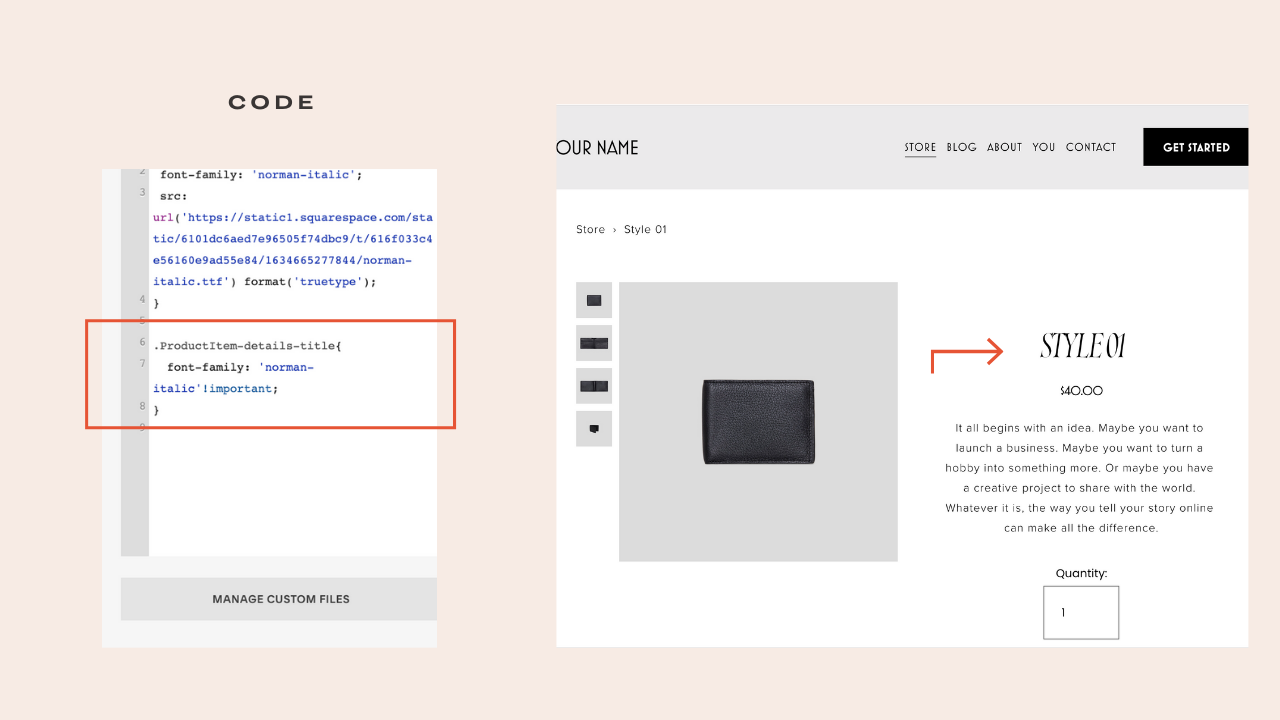
Note that the !important; is not for emphasis sake but part of the code. Whenever you write a code and it doesn’t take effect, what you can do is to add !important; it automatically tells the system that it needs to implement the code ASAP even if it is against the former code.
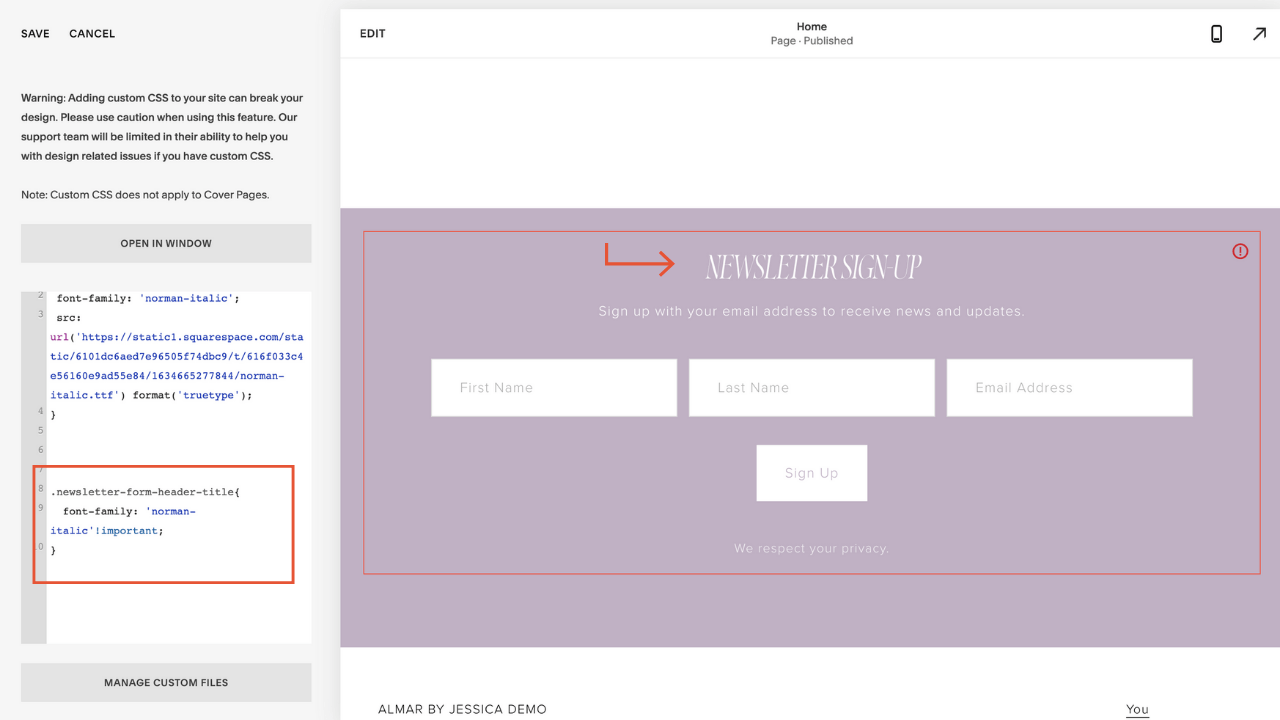
Custom Code for newsletter sign up
.newsletter-form-header-title{
  font-family: 'your font name here' !important;
}
Custom code for website title
.header-title-text{
font-family: 'your font name here' !important;
}

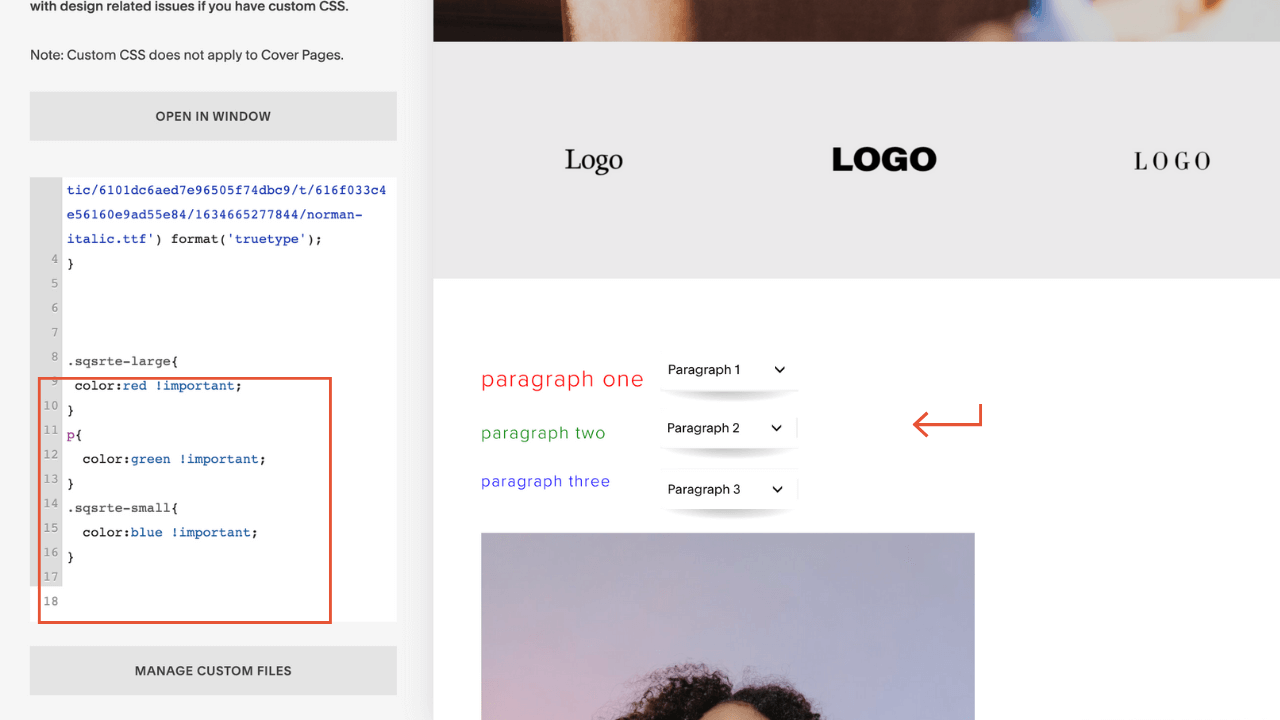
How to add custom font to different paragraphs
Similarly to headings h1, h2, h3 You can adjust your paragraph font on Squarespace as well, all you need to do is to add the identifier to the code. As i mentioned earlier Squarespace is big on adding custom id's to different elements, so for paragraphs instead of using p1, p2, p3, Squarespace has its own codes: .sqsrte-large, p, .sqsrte-small accordingly. For p1 we would use .sqsrte-large, and for p2 we would use .sqsrte-small, if we apply a styling to p, it would generally apply it to all paragraphs.
.sqsrte-large{
 color:red !important;
}
p{
  color:green !important;
}
.sqsrte-small{
  color:black !important;
}
Are you feeling overwhelmed by DIYing your website? I can help you, I am a Squarespace Web Designer building beautiful, functional websites that help you get found online.
Related Article: How To Create A Squarespace Landing Page + ( Easy Video Tutorial )How to Upload Custom Fonts To Squarespace
Wow! You’ve become a pro in changing custom font already. All you have to do now is try it out and apply your desired fonts to different parts of your website.
Squarespace has always been one of my favorite platforms to use when starting a new website. Their minimalistic approach and user-friendly interface make it a great host for a beginner. It’s no secret that Squarespace websites look great. They’re clean, professional, and easy on the eyes. And with the help of a little bit of code you can make it look even better.
We’ve looked at how to upload custom fonts in Squarespace, apply it to different aspects of your website and style your fonts. I can’t wait to see you flexing those code muscles!
