
How To Add Blog Sidebar to Squarespace 7.1 ( Video Tutorial )
Sign up for a free Squarespace trial here! #afflink
Did you ever want to create a blog sidebar but don't know how? Or maybe you're just tired of your plain old blog layout and want to jazz it up?
Creating a Squarespace blog has its advantage but there are days when you feel limited in the number of functionalities Squarespace is capable of and one of those days is when you badly want a Squarespace sidebar.
It’s no news that Squarespace 7.1 eliminated a sidebar in all templates and Squarespace 7.0 sidebars are specific to some template families (the Brine family not inclusive). Whether or not your Squarespace website has a sidebar, there are ways you can create a Squarespace sidebar using the native functionalities already available in your website, or opting for a plugin.

Looking for a unique website design for your business? Explore our Squarespace Web Design packages for a stunning website. Need to enhance your site's visibility? Our Squarespace SEO services are here to assist you. Curious about our work? Take a look at our Squarespace website designer portfolio for some inspiration!
What is a blog sidebar navigation
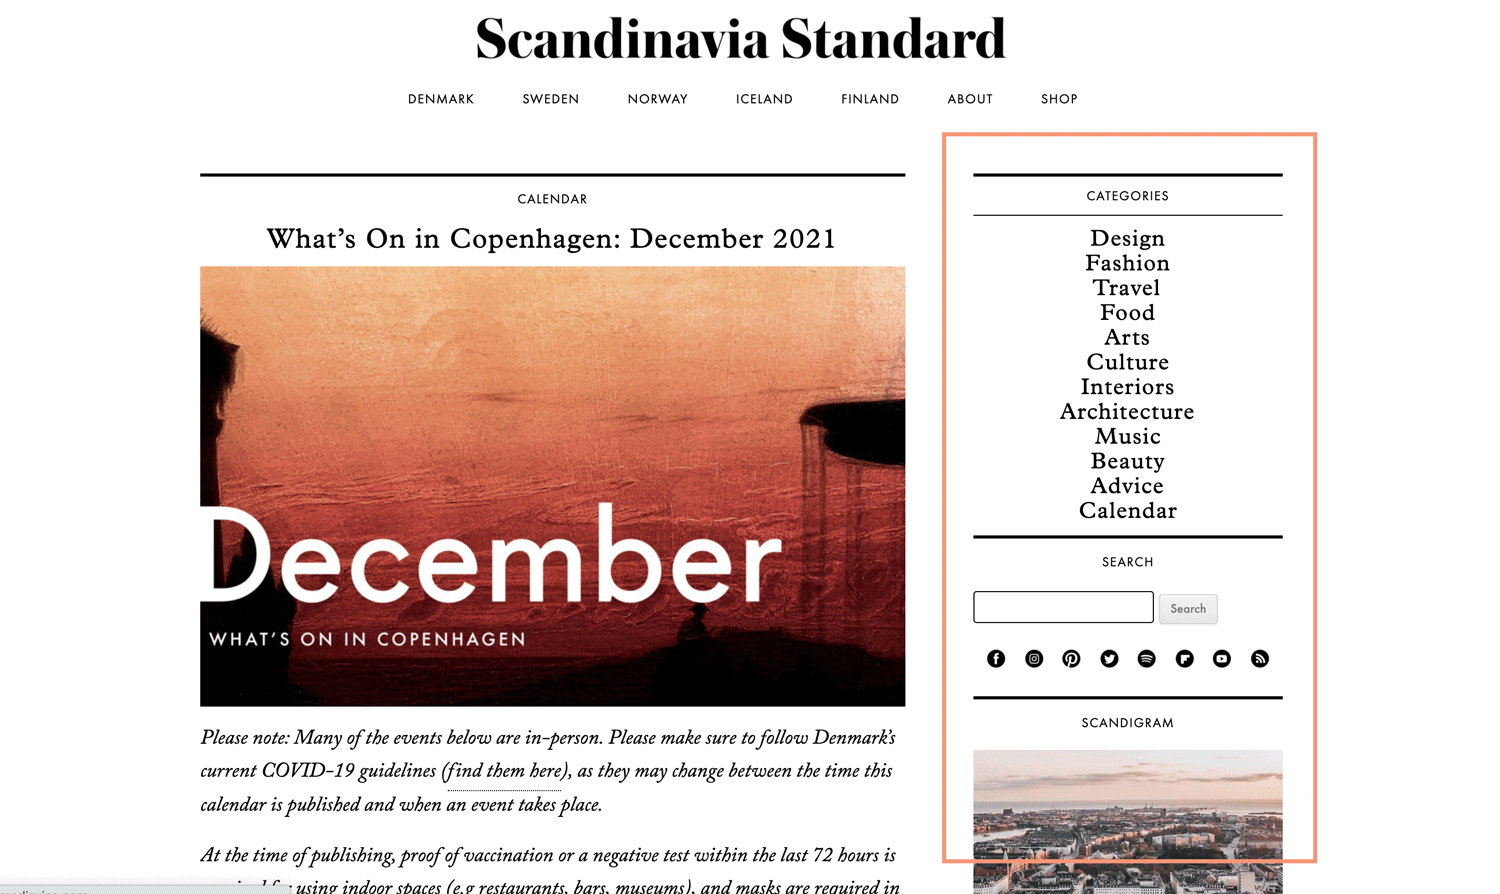
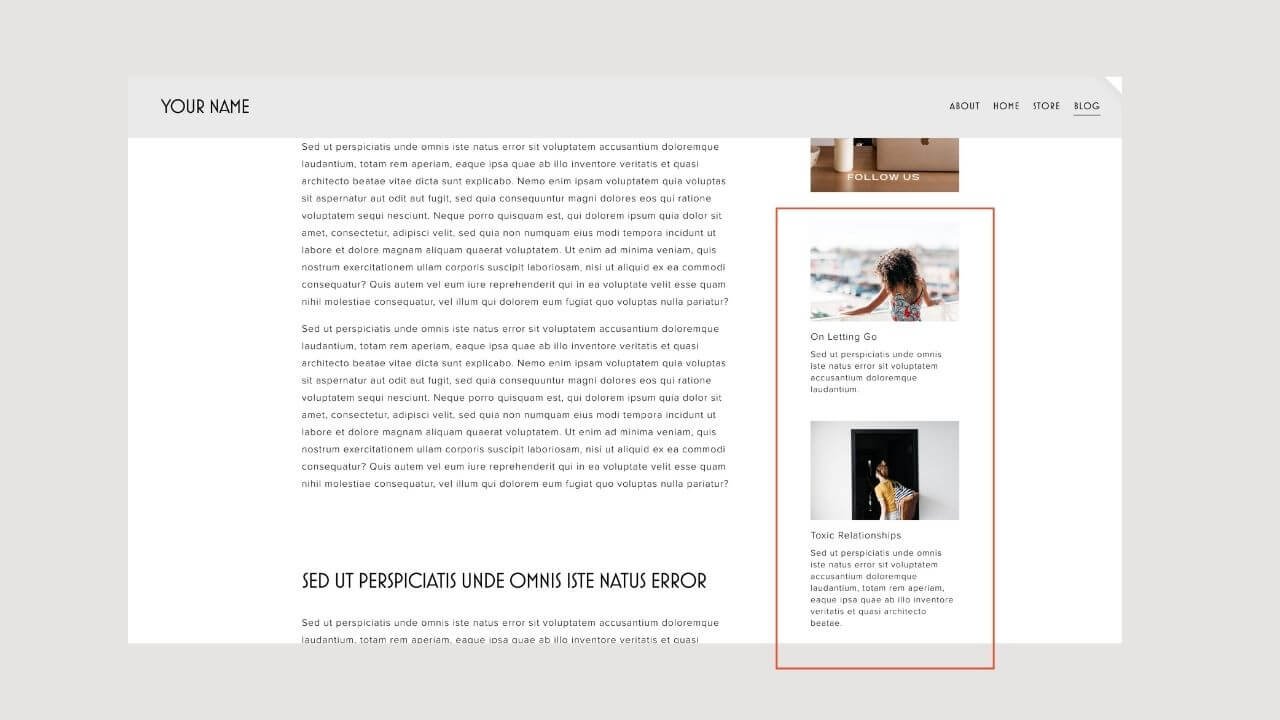
In case you don’t know what a sidebar is, let me bring you up to speed. A sidebar, also known as side navigation, is a column at the left or right side of a blog used to display a short bio of the author, freebies, promotions, ads, social links, Instagram feeds, blog
categories and a lot more.
Here is an example of what I am talking about
While sidebars may seem outdated, there are some advantages associated with them that would be of great benefit to your blog.
Why would you want to have a sidebar on your Squarespace website?
It’s good for SEO
The most frequent way people access your blog posts is by google searches or other websites. And they probably are on your page because of an important post that would be of benefit to them. After getting what they need, they’d likely leave your page and forget about your website.
One of the surest ways to get their attention is through a Squarespace side navigation. You can display a short bio of yourself that may pick their interest, offer an irresistible freebie, promote an ad that seems too good to be true, display similar blog posts that would want them to read more, or just position a button that would lead to another page.
Whatever element you choose to display, it would make them stay longer on your website and probably fall in love with it and if they fall in love with what you do, that means more sales for you directly or indirectly.
Great place to sell your products or services
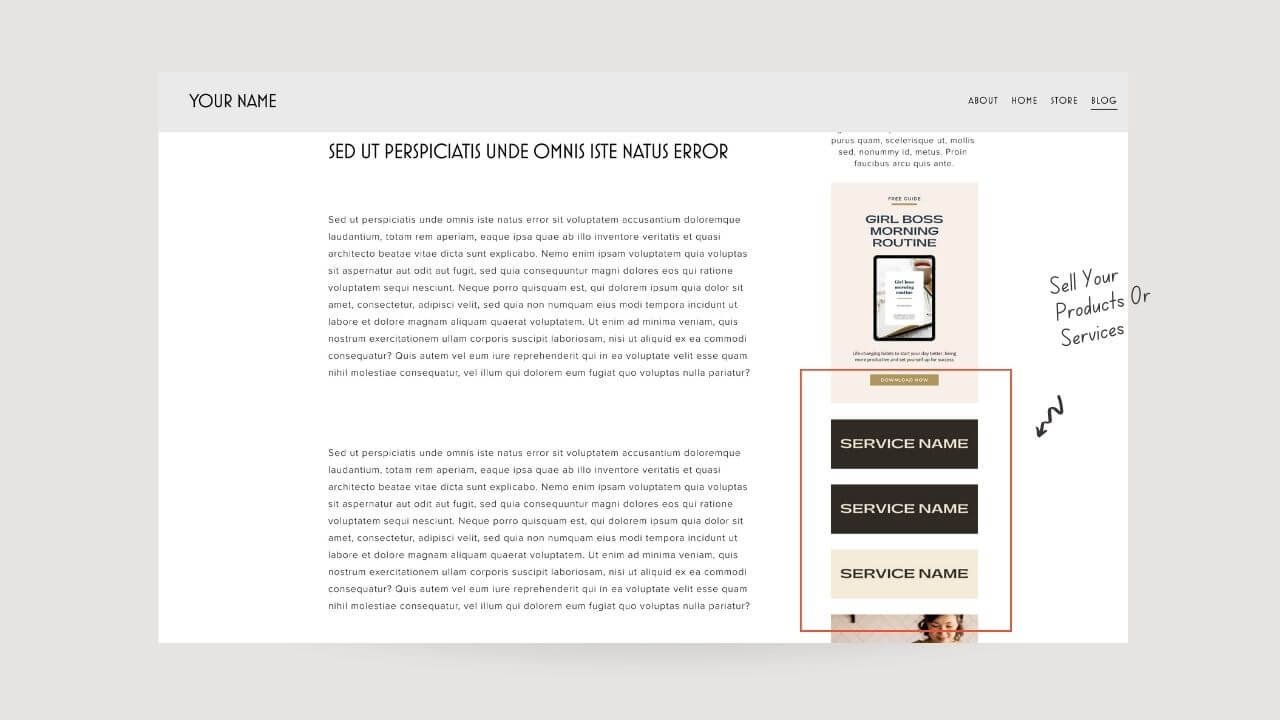
What better way to sell your product than an attractive sidebar complementing an insightful blog post? People love whoever gives them value. If they find value in your blog post, they probably won’t mind clicking on one of the information displayed on your sidebar.
Now, you can use your Squarespace sidebar to promote your services and products. Imagine if you wrote about why you should use Squarespace to build your website and your sidebar is displaying an attractive Book a consultation button that promises to help them define their business needs and help choose the best Squarespace template that would meet those needs.
They won’t hesitate to hear an expert guide them through the journey especially if the reader is already convinced by your post that Squarespace is definitely the bang.
So, your Squarespace side navigation is a great place to sell your products or services.
welcome your reader
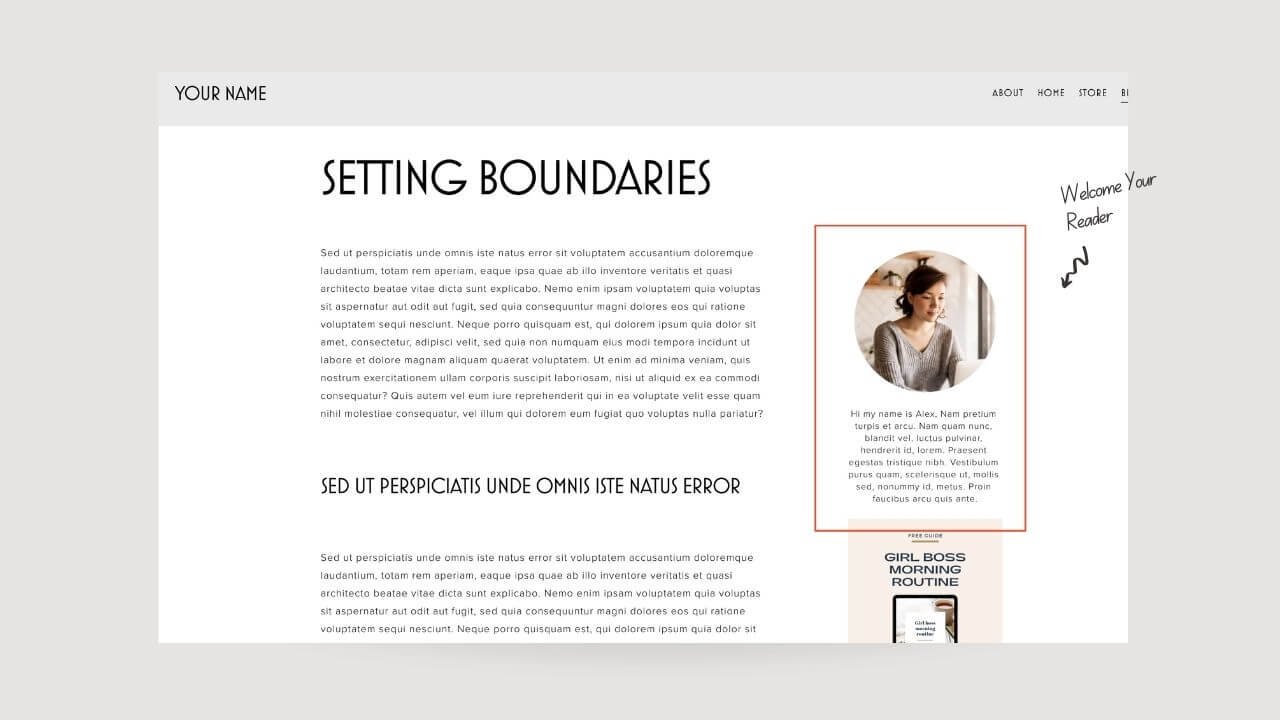
Who doesn’t want a bright, warm smile when entering a new place (that has probably gotten you nervous). I do!
You get a chance to welcome your reader with a smiling picture of you, a fun bio, and some irresistible offers to make their stay worthwhile using a sidebar.
Not only would your reader know who owns the site but also allows them connect with your passion and go through the goodies you have to offer. This can help convert the reader to a loyal customer if done well. So, getting a side navigation can be beneficial.
A place to promote your lead magnet and grow your email list
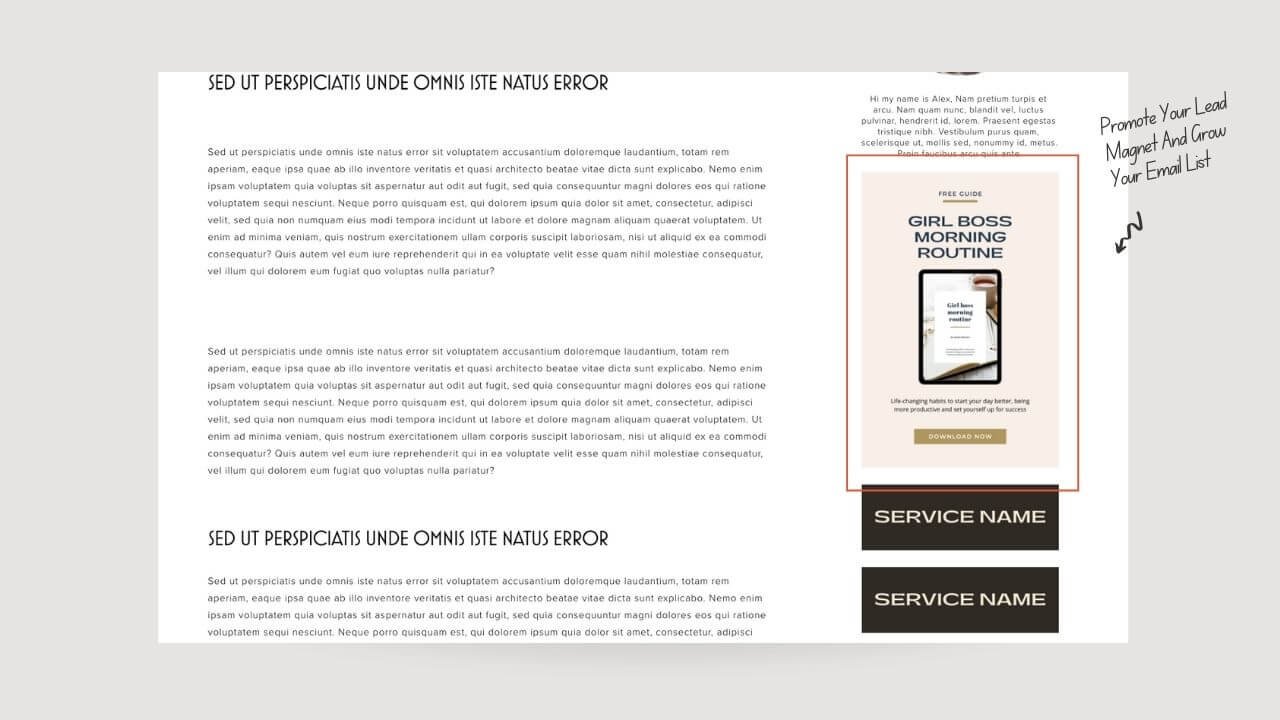
One proven way to grow your email list is by offering a beneficial, mouth-watering freebie. Here is a Template Example. And what other best way to do this than constantly putting it in view as they read through the post? If done well, some readers would even signup before coming back to what brought them to your site!
A Squarespace side navigation is one of the best places to promote your lead magnet and get people signing up for your emails. You should try it out.
drive traffic to other articles that you wrote
You’ve written a few great blog posts and you want to drive more traffic to them, right? After all, driving traffic to your articles is one of the best things you can do for your website. You can add links to your most popular articles in the sidebar, it will help you drive traffic to those articles. Squarespace sidebar can be of help.
Add Blog Sidebar to Squarespace 7.1 ( Video Tutorial )
If you liked this tutorial, be sure to check out my other video Squarespace Beginner Tutorials & resources.
You can have multiple sidebars
You can design as many sidebars as needed, you don’t have to stick to one sidebar for all your blog posts and pages. For example, if you want just a short bio of yourself in a particular post and you want to offer a signup space in another post, you can decide to create different sidebars for each purpose.
Also, Squarespace sidebars are not limited to blogs alone. A sidebar can be used on any other page. If you want to include a sidebar on one of your product’s pages, why not?
For example, let’s say you run an online store, your products will increase over time leading to more pages. You can take advantage of the sidebar by using it to create related products, reviews, ratings, and testimonials. It can also be used to display limited offers or special holiday discounts.
In some cases, a sidebar is used to display a shopping cart to help alert readers of their running charges.
You just have to determine what purpose the sidebar is meant to serve and whether it would convert if included.
How to create a (free) sidebar for Your Squarespace Website
If you don’t want to spend money on a plugin nor spend time figuring out codes, there’s a way to create a Squarespace sidebar for free using the settings available on your website. Let me walk you through the steps
Step one: Prepare everything you need for your sidebar
Before you get started, decide on how you want your sidebar to look and what you want to include in the sidebar. After that, create an image for each piece using your preferred graphics tool. I used Canva to create my images and I went with these cool shades of brown.
Some elements you can include in your bio are
Your image and a short bio
Lead magnet
Other products and services - Blog archives/similar posts
Here are the different images I came up with (picture)
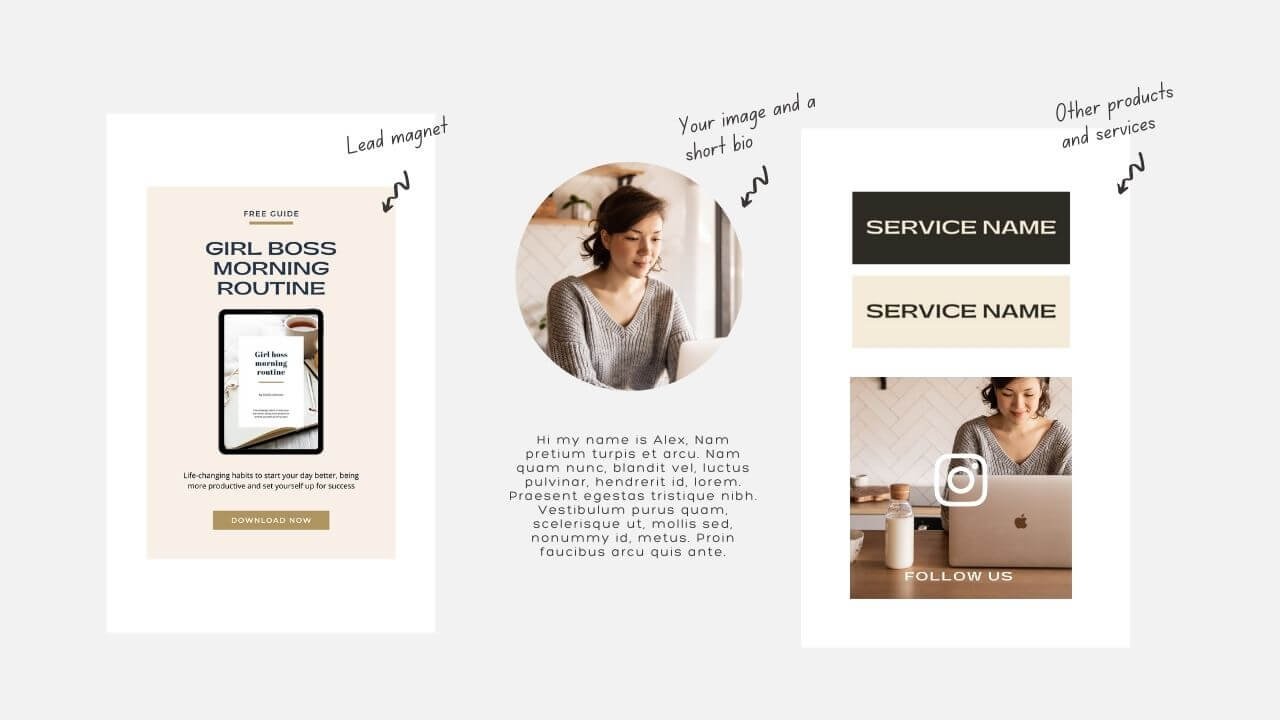
In my case, I created an image, a short bio, a freebie/lead magnet and I designed some buttons that are meant to lead to other pages.
Step two: Create a new blog page
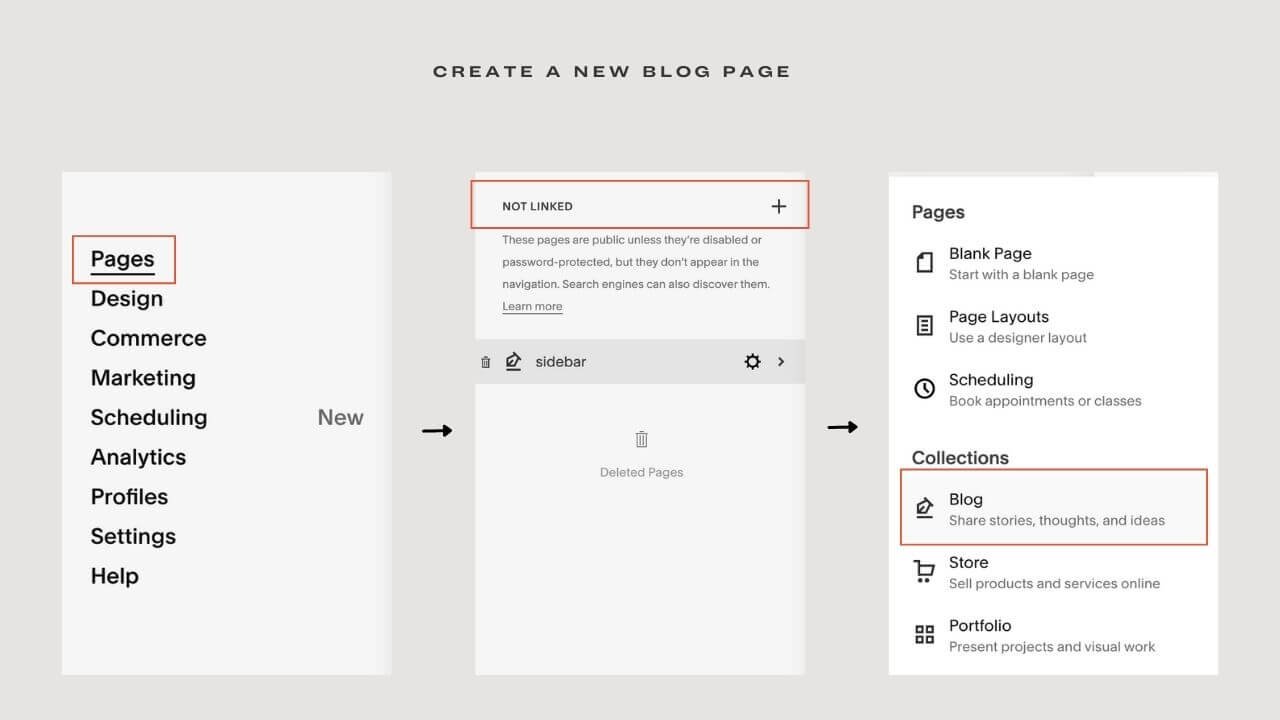
In the backend of your website, click Pages. From there, you will need to click the plus sign beside the not linked section because you don’t want your sidebar appearing as a page on your website.
After that, create a blog. To avoid being confused, label the blog ‘sidebar’.
Now, you would click the sidebar blog and add a new post by clicking on the + sign or use one
of the demo posts that come with the new blog page.
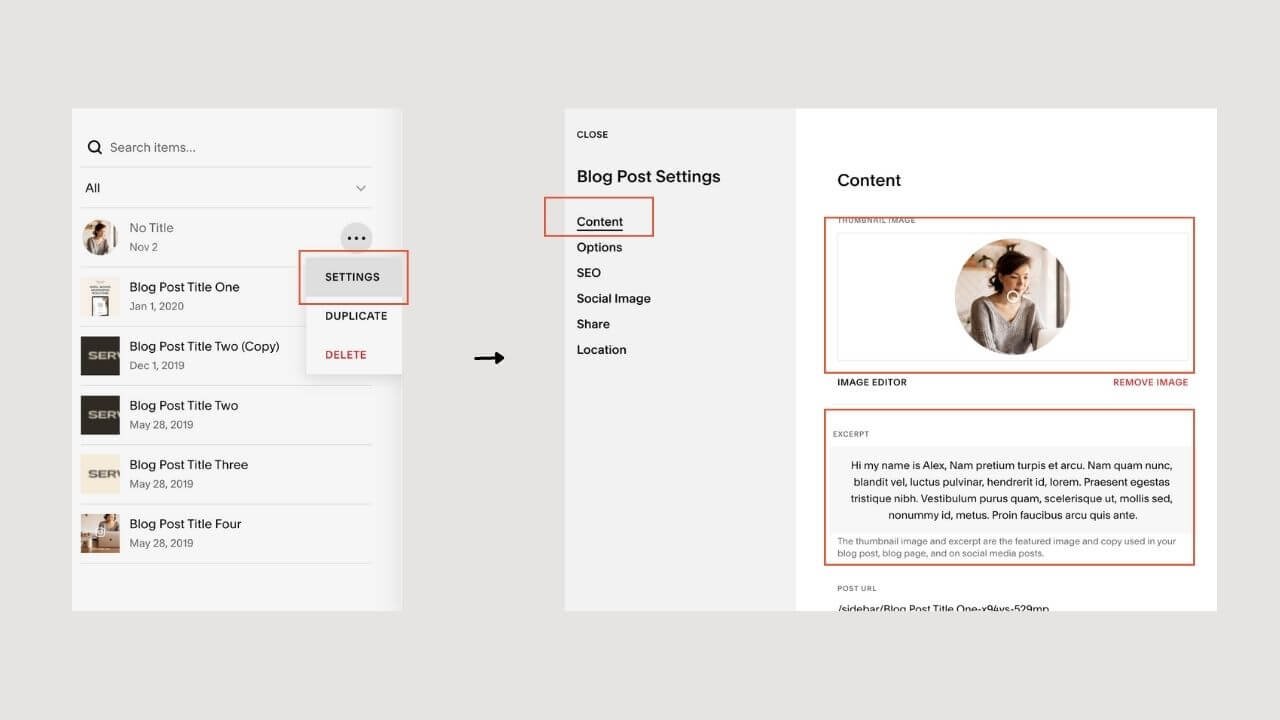
After your post is created, click the three dots beside the post and click Settings. Head to the post setting and click on Content, type in a title if you want a text displayed under the image.
In my case, I added a short bio text for Alex
Then, head to Options in the post setting, upload your image as a thumbnail image and add the link to the page you want it to lead to under source url.
Also, link your post title to the source url so that the text can link to the page as well. Make sure you turn on the link post title to url toggle. Here’s what I mean
When you are done, click Save and Publish.
Note: Squarespace displays in chronological order. So, you’d have to add the last element you want to display first.
Repeat the process for all the elements you want to be displayed on your sidebar. Always remember to link the images to the appropriate pages
Next, I moved to the lead magnet which is one of my free templates for the sidebar. I went to the second demo post and repeated the process. This time, I didn’t add a post title because the image already did the speaking.
From there, I added the two remaining images and linked them to the service page.
When you are adding your images, always remember to turn on the link post title to url and click Save
Add Your Links
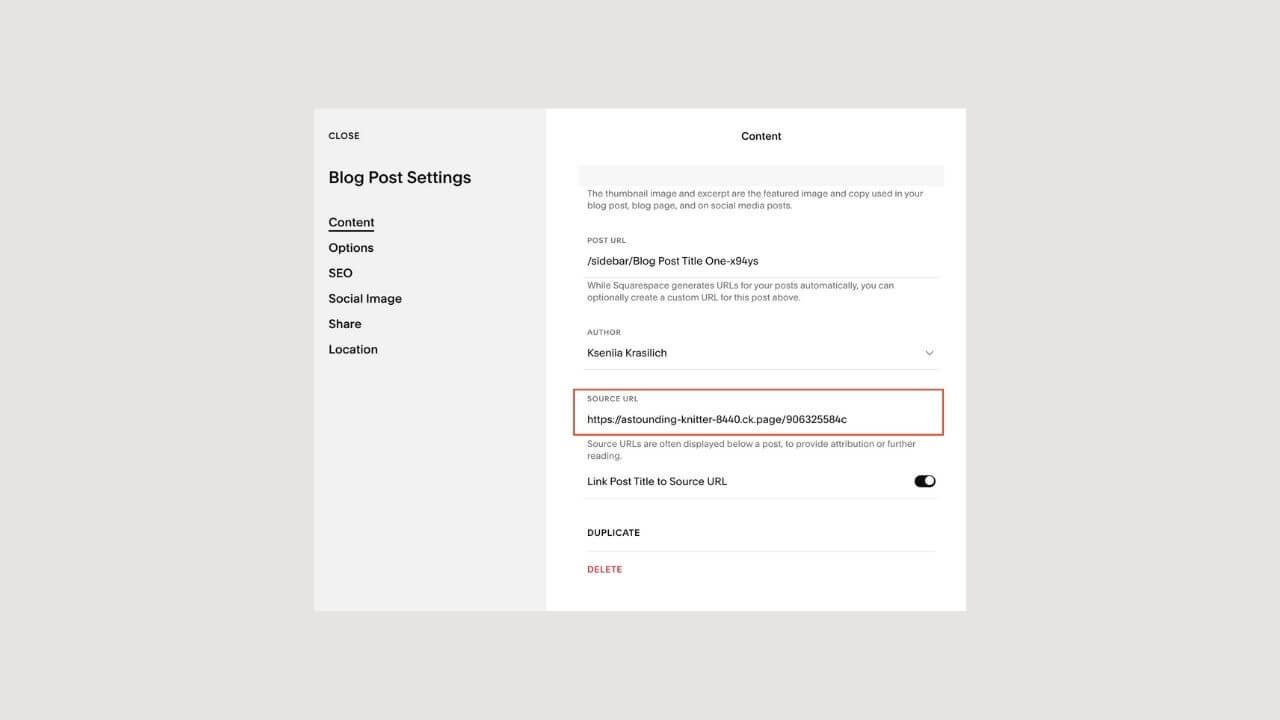
You would want to link each image to an url, for example, your profile image would most likely be linked to an About page, Lead Magnet image would link to a place on your website where visitors can access your lead magnet, and each service image would direct visitors to a Service page on your website. To add link click Settings > Content > Source Url (img below)
Step three: Add your sidebar to your desired page.
You’ve prepared your images, compiled them in the sidebar blog, and linked them to the required pages, now it is time for the final step—displaying your Squarespace side navigation on your page.
To do this, we will be using a summary block.
To start, head to the page you want your Squarespace sidebar displayed. I am displaying my sidebar on a blog page as seen in the video.
Click on any of the posts and click Edit. When you are in the edit mode, hover on the text until an insert point appears (a purplish + sign).
Click the plus sign and insert a spacer, adjust the text to left or right depending on where you want your sidebar to sit.
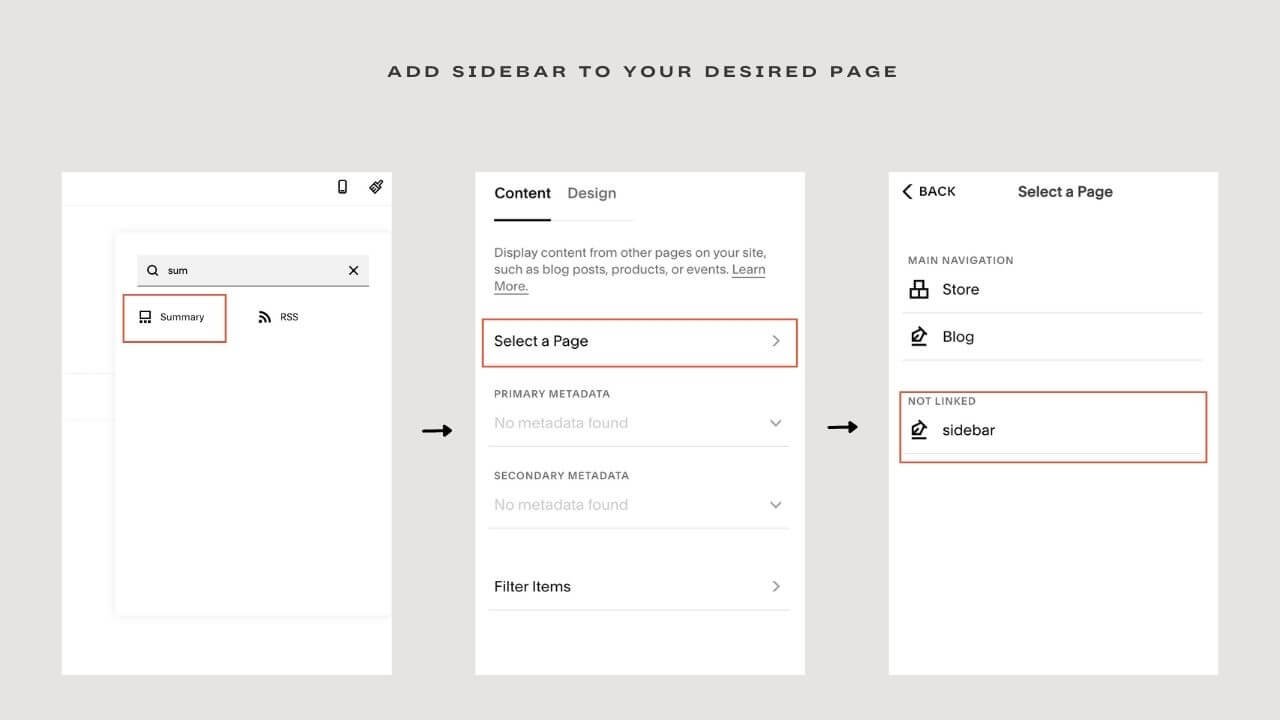
After doing this, select the insert point on the space bar and then select a summary block
A floating menu split into Content and Design will pop up. Under Content, click on Select a Page and choose the sidebar page (or whatever you named it). Instantly, the page will appear in the form of a Squarespace side navigation. Yay! You’ve created your first sidebar.
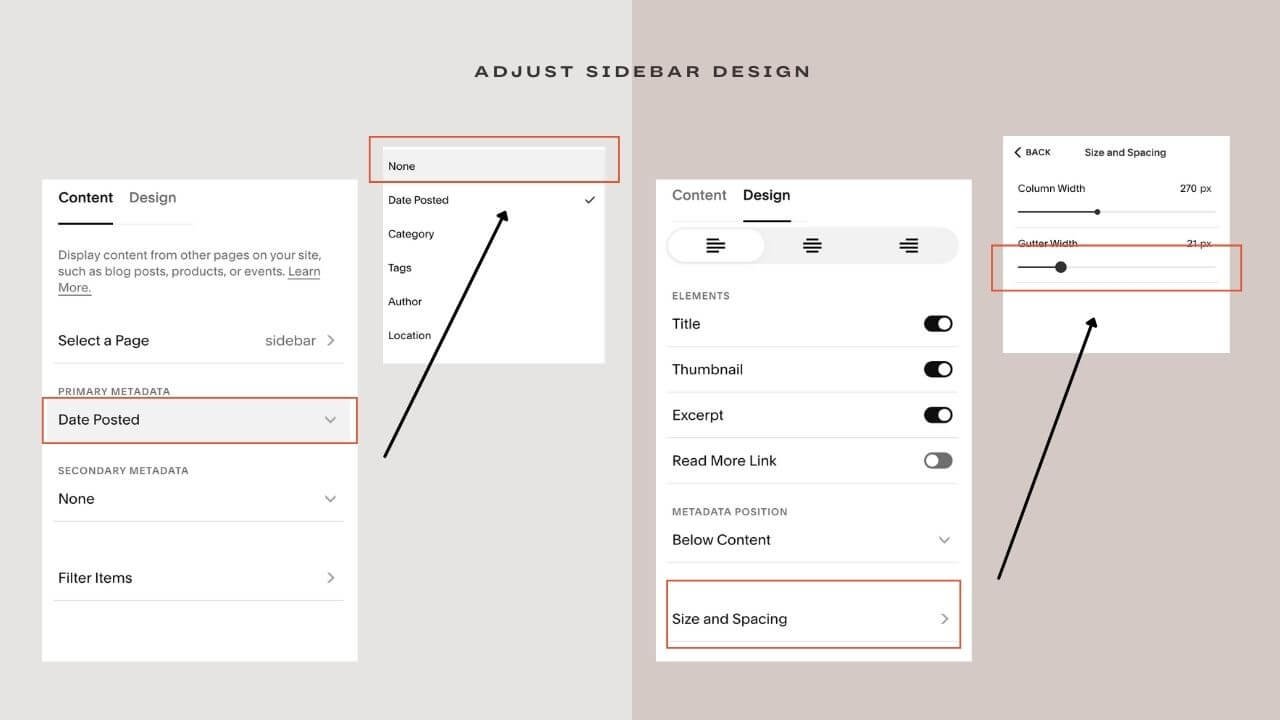
Now, head to design, Turn off the Title. You can also adjust the size and space until you are satisfied.
Step four: Test your sidebar
Now that you’ve successfully created and displayed your sidebar, it’s time to take it for a test drive. Click on every element and see if it leads to the supposed pages. If it does, your Squarespace side navigation is ready for a ride!
In case the elements are misarranged, all you need to do is head to the sidebar page and change the dates until they are displayed accordingly. Remember, the most recent image will be posted first.
Also, if you want to add a new element to your sidebar, add your element and edit the date until it’s in the right position and if you want to remove an element, all you need to do is delete the blog post.
Squarespace Blog sidebar plugin
The other method that can be employed if you want to avoid wasting time on the design process is a plugin. There’s a great sidebar plugin offered by SQSPTHEME which works on both Squarespace 7.0 and Squarespace 7.1 websites. It allows you to create and customize sidebars for any page you like and also enables you to disable the sidebars.
Not to worry, I will walk you through the processes as well.
Video How to Use SideBar Plugin
Step one: Purchase your plugin
This plugin offers two licenses-- Standard and Business. The Standard license enables you to use it across different pages on the same website while the Business gives you the flexibility to use the same plugin on two websites.
They also offer a concierge installation in case you don’t want to deal with the installation process. And if you want a customized sidebar tailored to a specific need, all you need to do is contact them and they would get it done for you at a decent price.
Step two: Prepare your sidebar
You still got to prepare your sidebar using the first two steps listed in the how to create a sidebar for free above. Create a blog and upload the posts linking to other pages.
Step three: Install your sidebar
Instead of using a summary block like the first method required, you only need to follow the detailed instructions on how to install the plugin that would be provided after purchase.
You’ll upload both the CSS and Javascript files to your side and then add some code (which has already been provided, all you need to do is copy and paste) into your blog page.
On top of that, you get the chance to create different sidebars for different blogs and pages on your site. You also get the chance to customize the width and size of your sidebar.
Here’s a detailed explanation of how to go about this (link)
Lastly, you don’t have to worry about safety because SQS THEMES assures that the plugin is totally safe and will not slow down your websites. It is super easy to upgrade to the business plan and works well on index pages.
Squarespace sidebar to your blog
When it comes to sidebar, people are opinionated about whether it’s still important and useful. But just like most things, a sidebar can have its advantages and disadvantages
With a sidebar, you can display your products, build email lists, welcome your readers and make them stay longer on your websites but you should also consider that sidebar becomes bottom bars when your post is opened through a mobile phone. What I mean is, the sidebar will be displayed last therefore you wouldn’t get that side view that you desired. But whether or not it is displayed on mobile or website, it still gives readers a chance to know who you are and what they stand to gain.
I hope you gained a lot from this article. If yes, kindly drop your comments below.
